Customizing the login page
This recipe assumes that the reader already setup their own sprinkle and is familiar with the basics of UserFrosting.
This recipe will guide you in customizing the UserFrosting login screen. Specifically, we'll explain how to:
- Disable the registration
- Change the destination the user is taken to after a successful login
- Changing the visual style of the login page
If you haven't already, set up your site Sprinkle as per the instructions in "Your First UserFrosting Site". For the purposes of this tutorial, we will call our Sprinkle site.
This recipe was sponsored by adm.ninja. Get in touch with the UserFrosting team if you want to sponsor a custom recipe for your organization!
Disabling registration
For many reasons, you may want to disable the ability for someone to create a new account. Fortunately, UserFrosting provides an option inside the configuration files to disable the registration feature. Since you should never modify code directly in the core UserFrosting codebase, the clean way to do this is to override the default configuration in your own Sprinkle.
To do this, first we'll need to create a config/ directory inside your Sprinkle directory structure. Inside this directory, we'll create a PHP file named default.php.
The name of the configuration file is important. The
defaultconfig file will be automatically loaded when your Sprinkle is included by the system. See the Environment Mode chapter if you want to edit a configuration value for another environment mode.
Inside your newly created config/default.php file, you add any configuration options you want to overwrite or add. In this case, we want to set the site.registration.enabled option to false:
<?php
    return [
        'site' => [
            'registration' => [
                'enabled' => false
            ]
        ]
    ];
Save the file, reload the login page and voilà! Not only will the registration link disappear, but all relevant registration endpoints will also be deactivated. You will still be able to create a new user manually using the administration interface.
See the Configuration Files chapter for more information about editing configuration.
If you need to be able to control basic configuration through the web interface, check out the
ConfigManagerSprinkle from the Community Sprinkles. This easy to install Sprinkle provides a graphical UI to manage some of the basic UserFrosting settings, including registration, and provides APIs to add you own custom settings.
Changing the post-login destination
When a successful login occurs, the user will be taken to the /dashboard page by default. This can be customized by overwriting the redirect.onLogin service. Just like the configuration options, this should be done in your own sprinkle by overwriting that service. In this tutorial, we'll change the default behaviour to redirect the user to the index page (/ route) upon login.
First, create a class src/ServicesProvider/ServicesProvider.php in your Sprinkle with the following content:
<?php

namespace UserFrosting\Sprinkle\Site\ServicesProvider;

use Psr\Http\Message\ResponseInterface as Response;
use Psr\Http\Message\ServerRequestInterface as Request;
use UserFrosting\Sprinkle\Core\Facades\Debug;

/**
 * Registers services for my site Sprinkle
 */
class ServicesProvider
{
    /**
     * Register my site services.
     *
     * @param Container $container A DI container implementing ArrayAccess and container-interop.
     */
    public function register($container)
    {

    }
}
Don't forget to change
Sitefor your sprinkle name in the namespace definition!
Your sprinkle now has a basic service provider. Now it's time to override the default service. The process here is the same as adding a service. First, let's copy to our service provider the service we want to overwrite. You'll find the redirect.onLogin service in app/sprinkles/admin/src/ServicesProvider/ServicesProvider.php and it should look similar to this:
/**
 * Returns a callback that handles setting the `UF-Redirect` header after a successful login.
 *
 * Overrides the service definition in the account Sprinkle.
 */
$container['redirect.onLogin'] = function ($c) {
    /**
     * This method is invoked when a user completes the login process.
     *
     * Returns a callback that handles setting the `UF-Redirect` header after a successful login.
     * @param \Psr\Http\Message\ServerRequestInterface $request
     * @param \Psr\Http\Message\ResponseInterface      $response
     * @param array $args
     * @return \Psr\Http\Message\ResponseInterface
     */
    return function (Request $request, Response $response, array $args) use ($c) {
        // Backwards compatibility for the deprecated determineRedirectOnLogin service
        if ($c->has('determineRedirectOnLogin')) {
            $determineRedirectOnLogin = $c->determineRedirectOnLogin;

            return $determineRedirectOnLogin($response)->withStatus(200);
        }

        /** @var UserFrosting\Sprinkle\Account\Authorize\AuthorizationManager */
        $authorizer = $c->authorizer;

        $currentUser = $c->authenticator->user();

        if ($authorizer->checkAccess($currentUser, 'uri_dashboard')) {
            return $response->withHeader('UF-Redirect', $c->router->pathFor('dashboard'));
        } elseif ($authorizer->checkAccess($currentUser, 'uri_account_settings')) {
            return $response->withHeader('UF-Redirect', $c->router->pathFor('settings'));
        } else {
            return $response->withHeader('UF-Redirect', $c->router->pathFor('index'));
        }
    };
};
The important part here is this:
if ($authorizer->checkAccess($currentUser, 'uri_dashboard')) {
    return $response->withHeader('UF-Redirect', $c->router->pathFor('dashboard'));
} elseif ($authorizer->checkAccess($currentUser, 'uri_account_settings')) {
    return $response->withHeader('UF-Redirect', $c->router->pathFor('settings'));
} else {
    return $response->withHeader('UF-Redirect', $c->router->pathFor('index'));
}
This uses the authorizer to decide where to redirect the user. First, it will redirect to the dashboard named route if the user has access to it. If they don't, it will try the settings named route. Finally, if the user doesn't have access to that either, it'll redirect the user to the index named route. Since in our case, we always want to redirect to the index route, we'll change that part to:
return $response->withHeader('UF-Redirect', $c->router->pathFor('index'));
Note that we use the Slim router's
pathFormethod here to get the route definition from it's name. This is the same as doingreturn $response->withHeader('UF-Redirect', '/');. Check out Slim's documentation for more info on named routes.
Our complete src/ServicesProvider/ServicesProvider.php file should now look like this:
<?php

namespace UserFrosting\Sprinkle\Site\ServicesProvider;

use Psr\Http\Message\ResponseInterface as Response;
use Psr\Http\Message\ServerRequestInterface as Request;
use UserFrosting\Sprinkle\Core\Facades\Debug;

/**
 * Registers services for my site Sprinkle
 */
class ServicesProvider
{
    /**
     * Register my site services.
     *
     * @param Container $container A DI container implementing ArrayAccess and container-interop.
     */
    public function register($container)
    {
        /**
         * Returns a callback that handles setting the `UF-Redirect` header after a successful login.
         *
         * Overrides the service definition in the account Sprinkle.
         */
        $container['redirect.onLogin'] = function ($c) {
            /**
             * This method is invoked when a user completes the login process.
             *
             * Returns a callback that handles setting the `UF-Redirect` header after a successful login.
             * @param \Psr\Http\Message\ServerRequestInterface $request
             * @param \Psr\Http\Message\ResponseInterface      $response
             * @param array $args
             * @return \Psr\Http\Message\ResponseInterface
             */
            return function (Request $request, Response $response, array $args) use ($c) {
                return $response->withHeader('UF-Redirect', $c->router->pathFor('index'));
            };
        };
    }
}
Since we don't need them anymore, the portion of the code for backwards-compatibility with
determineRedirectOnLogindoesn't need to be included in our service definition. The same goes for the$authorizerand$currentUserreferences.
From now on, when a user logs in, they will be taken to the index page (/ route). From there, you can change the redirect value to any route you want. You can also use other services, like authorizer in the default behaviour, to add more logic to your redirect strategy.
Custom style
Customizing the visual style of the login page is similar to any other component of UserFrosting. You might have guessed it - it involves overwriting the default code in your own sprinkle. To change the style of the login page, we'll need to override two types of resources: templates and assets. Note that this process is typically the same for any page you want to change within UserFrosting.
Customizing the template
Let's start by overriding the base template for the login page. First, copy the base template to your sprinkle. You'll find the base template in app/sprinkles/account/templates/pages/sign-in.html.twig. Once copied over to your sprinkle, any changes made to your copy will override the base version, as long as it follows the same folder structure.
For this example, let's change the site title position:
<div class="login-box">
    <div class="login-box-body login-form">
        <div class="login-logo">
            <a href="{{site.uri.public}}">
                <img src="{{assets.url('assets://userfrosting/images/cupcake.png')}}">
                <p>{{site.title}}</p>
            </a>
        </div>
        <!-- /.login-logo -->

        <div class="form-alerts" id="alerts-page"></div>

        <form action="{{site.uri.public}}/account/login" id="sign-in" method="post">
          ...
        </form>

        <a href="{{site.uri.public}}/account/forgot-password">{{translate('PASSWORD.FORGET')}}</a><br>
        <a href="{{site.uri.public}}/account/resend-verification">{{translate('ACCOUNT.VERIFICATION.RESEND')}}</a><br>
        {% if site.registration.enabled %}
            <a href="{{site.uri.public}}/account/register">{{translate('REGISTER')}}</a>
        {% endif %}

    </div>
    <!-- /.login-box-body -->
</div>
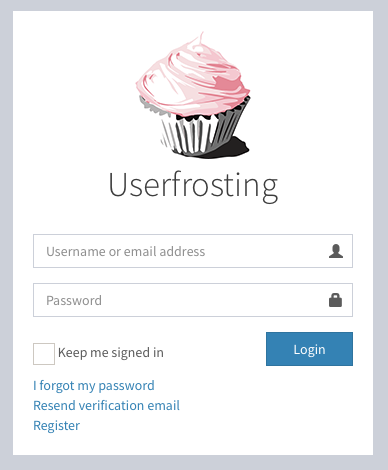
Did you notice how the login-logo div is now inside the login-box-body and the image, from the core sprinkle, was added? Once you refresh the page, you should see the result:
You can also use the blocks definition to partially edit a template. See the Extending Templates and Menus recipe for more information.
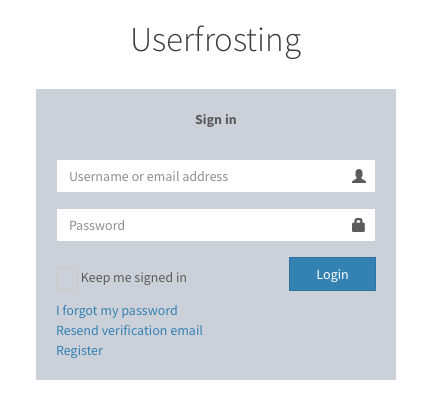
Customizing the CSS
Customizing the CSS is similar to overriding the template, except that it involves registering a new asset file in the asset-bundle definitions. Since UserFrosting uses the AdminLTE theme, the default login page style comes directly from AdminLTE and can't be overridden by simply replacing a CSS file. We'll need to create our own custom CSS file and add it to the assets bundle to override the default CSS rules.
First, let's create a new assets/css/login-page.css file and add the following code to that file. This will invert the colors of the background and login box on the login page. Feel free to make whatever styling changes you want on that page here.
.login-page {
    background-color: #ffffff;
}

.login-box-body {
    background-color: #d2d6de;
}
We now need to add our new login-page.css file to the css/main bundle. In the root directory of your sprinkle, create a asset-bundles.json file and add the following code:
{
    "bundle": {
        "css/main": {
            "styles" : [
                "css/login-page.css"
            ],
            "options": {
                "result": {
                    "type": {
                        "styles": "plain"
                    }
                },
                "sprinkle": {
                    "onCollision": "merge"
                }
            }
        }
    }
}
See Extending and overriding bundles for more information on how asset bundles work.
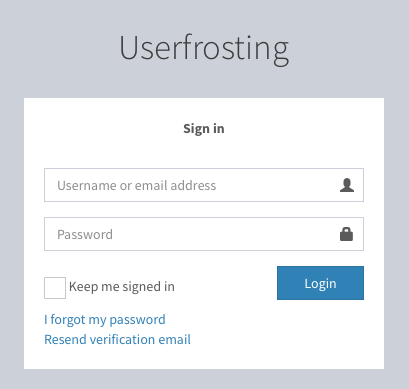
Your new CSS file should be loaded when you refresh the page and you should see the result: